Phone
- Emails on Phone
- Giacom 2016 Phone email setup - iOS
- Giacom 2016 Phone email setup - Android
- Yealink Phone Showing RPSing
Emails on Phone
Android:
https://support.google.com/work/android/answer/9412194?hl=en
Use your email address and usual log on password.
Tap Settings.
Tap Passwords & Accounts.
Tap Add Account.
Tap Exchange.
Tap Email and key in your email address - ..@..co.uk
Tap Password and key in the password for your email account. -
Tap Description and key in the required name - Company
Tap Next.
Tap Server and key in the server address -
Tap Domain and key in the domain name - *leave blank*
Tap Username and key in your username for the server - ...
Tap Password and key in the password for your email account -
Tap Next.
Tap the indicator next to the required data type to turn synchronisation for the specific data type on or off.
Tap Save.
Giacom 2016 Phone email setup - iOS
Tap Settings > Mail, Contacts, Calendars > Add Account > Exchange

Enter email address, password and description, then select Next:

Your iOS device will now try to locate your Exchange Server. If necessary enter the appropriate Exchange server name from the table below, and tap Next
Server name : activesync.giacomcp.com

Upon completion you can choose which types of data to sync with your Exchange account:

PLEASE NOTE: To modify your Exchange settings, Tap Settings > Mail > Contacts > Calendars, select your Exchange account, and tap Account Info
Giacom 2016 Phone email setup - Android
From your Android home screen access your phone settings and then Accounts. Then select Add Exchange ActiveSync account.
Enter your Email address and Password. Check Send email from this account by default (available only if you have already added another email account) to set this as the default email account and then tap Next

Your device will attempt to automatically find the additional details needed to set up your account. If it is successful, you will skip to Step 5. If it cannot automatically find the additional details needed, you will see the message Setup could not finish. Tap Edit details or configure manually to enter the additional information manually
Enter the appropriate Exchange server name as in the screenshots below, select Use secure connection (SSL) and tap Next
Server name: activesync.giacomcp.com

Review the Activation screen. Uncheck the Always show option if you do not want to see this message again when setting up an ActiveSync account, and tap OK

The phone will then check the Exchange Server settings and display the Remote Security Administration message:

Tap OK
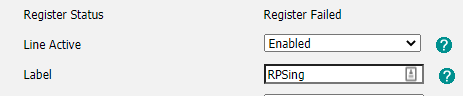
Yealink Phone Showing RPSing
If you have recently factory reset a Yealink handset then you may see the following notifications on your devices screen. ‘input sn‘ on the first line (top left of the screen) or ‘RPSing’ on the account information on the web interface.
In this blog, we will take you through a few short steps you can take to solve this issue and have your phones back up and running as soon as possible.
Step 1:
Click on the function key where ‘input sn‘ is located. You should then be presented with the following page:
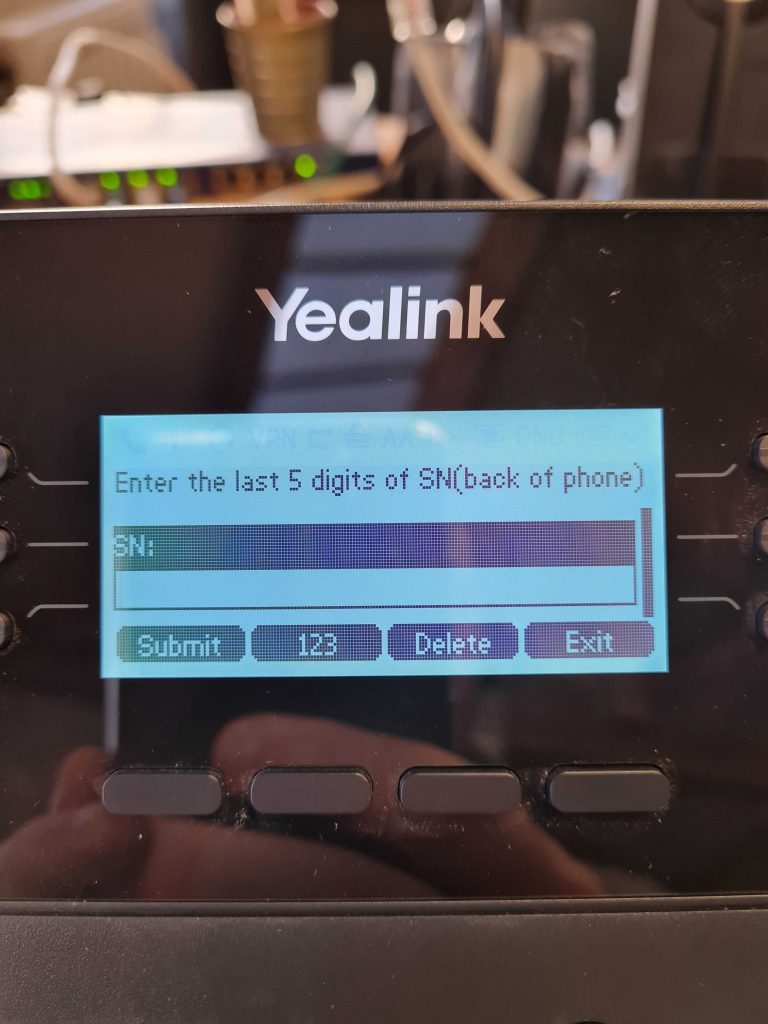
Enter the last 5 digits of the serial number from the underside / back of the phone (Not the MAC address)
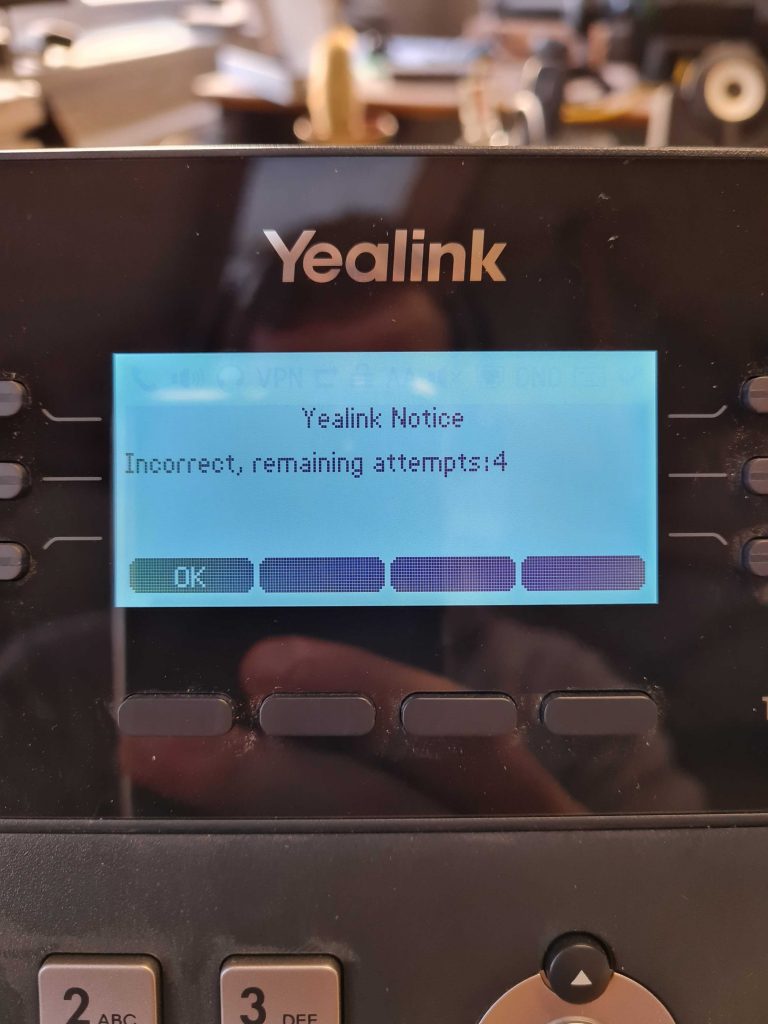
You get x5 attempts at entering the correct SN, if you enter the incorrect serial number you will get the following message:
Step 2:
Once you have entered the last 5 digits of the serial number the phone should then reset and boot up as normal.
Entering the serial number bounds the phone onto the Yealink RPS account.
If you run into any issues or would like more Yealink technical advice, please contact support@safetynet-it.com or call 0333 305 8224.